
Introduction
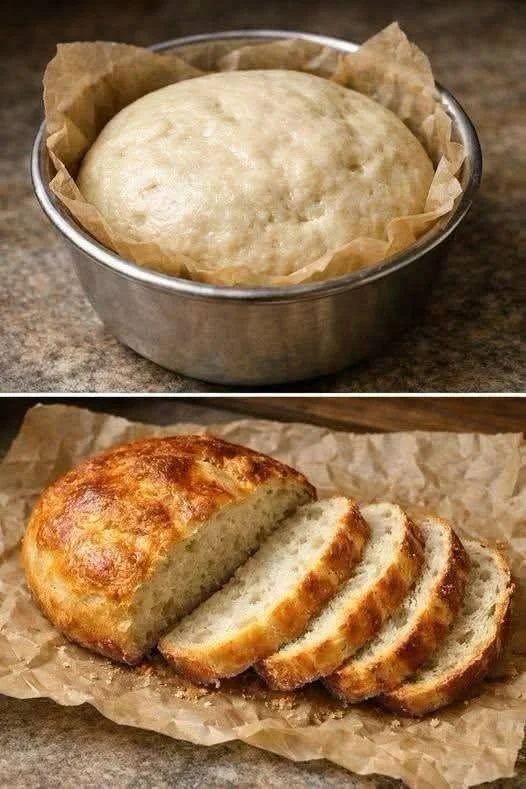
There is nothing quite like the smell of freshly baked homemade bread filling your kitchen. This easy homemade artisan bread features a beautifully golden, slightly crispy crust and a soft, fluffy interior. Its rustic round shape makes it look like a fresh loaf from a traditional bakery.
Made with simple pantry ingredients, this recipe is perfect for beginners who want to enjoy homemade bread without complicated techniques or expensive equipment. The dough comes together with flour, water, yeast, salt, and a little sugar. After rising, it is shaped into a round loaf and baked until golden brown.
This artisan bread is delicious served warm with butter, jam, olive oil, or cheese. It also pairs wonderfully with soups, pasta, salads, and family dinners. Once you try making bread at home, you may find that this simple recipe becomes a regular part of your baking routine.
Recipe Overview
- Preparation Time: 15 minutes
- First Rising Time: 1–1½ hours
- Second Rising Time: 20–30 minutes
- Baking Time: 35–40 minutes
- Total Time: Approximately 2½–3 hours
- Yield: 1 medium round loaf
- Servings: Approximately 10 slices
- Difficulty: Easy
- Oven Temperature: 400°F (200°C)
Ingredients
The following quantities make one medium-sized artisan bread loaf.
- 375 g bread flour or all-purpose flour
- 300 ml lukewarm water
- 7 g instant yeast
- 6 g salt
- 4 g granulated sugar
- 14 g olive oil, optional
- Extra flour, as needed for shaping
Ingredient notes: Bread flour gives the loaf a slightly chewier texture, while all-purpose flour works well for a softer, everyday loaf. The water should feel comfortably warm rather than hot, because excessively hot water can damage the yeast.
Equipment Needed
- Large mixing bowl
- Wooden spoon or dough spatula
- Kitchen scale
- Clean kitchen towel or plastic wrap
- Baking parchment
- Oven-safe baking dish
- Wire cooling rack
- Serrated bread knife
Make sure your baking dish is rated for use at 400°F (200°C). Never place an ordinary mixing bowl in the oven unless the manufacturer confirms that it is oven-safe.
Step-by-Step Instructions
Step 1: Prepare the Yeast Mixture
Pour the lukewarm water into a large mixing bowl. Add the granulated sugar and instant yeast, then stir gently to combine.
Let the mixture stand for approximately 5 minutes. Although instant yeast can usually be mixed directly with flour, this short resting period helps distribute it throughout the dough.
If you are using active dry yeast instead of instant yeast, follow the activation instructions on its package.
Step 2: Add the Flour and Salt
Add the flour and salt to the yeast mixture. Use a wooden spoon or sturdy spatula to mix everything together.
Continue mixing until the flour absorbs the water and a rough dough forms. Scrape the sides of the bowl to incorporate any remaining flour.
The dough should feel soft and slightly sticky. Avoid adding too much extra flour at this stage, as an overly dry dough can produce dense bread instead of a tender interior.
Step 3: Knead the Dough
Transfer the dough to a lightly floured work surface. Press it forward with the heel of your hand, fold it back, and repeat the movement.
Continue kneading for approximately 8–10 minutes, until the dough becomes smoother, stretchier, and more elastic.
If the dough sticks to your hands, use a small amount of flour on your fingers rather than adding large amounts directly to the dough. Proper kneading develops the structure needed to hold the air bubbles created during rising.
If using olive oil, add it and knead until it is incorporated and the dough feels smooth and manageable.
Step 4: Allow the Dough to Rise
Place the dough in a lightly greased bowl. Cover it with a clean kitchen towel, plastic wrap, or a suitable lid.
Leave the bowl in a warm place for approximately 1–1½ hours, or until the dough has roughly doubled in size.
The exact rising time depends on your kitchen temperature and the freshness of your yeast. During fermentation, the yeast produces gas that expands the dough, making it lighter and airier.
Allow enough time for the dough to rise properly. Rushing this stage can affect the bread’s final texture.
Step 5: Shape the Round Loaf
Once the dough has risen, transfer it carefully to a lightly floured surface.
Gently press it to release some of the larger air pockets. Fold the edges toward the center, then turn the dough over so the smoother side faces upward.
Cup your hands around the dough and rotate it gently against the work surface to create a round shape. Keep the outer surface slightly taut without tearing it.
A smooth, rounded loaf will hold its shape better during the second rise and baking.
Step 6: Prepare the Baking Dish
Line a suitable oven-safe round baking dish with parchment paper.
Place the shaped dough into the prepared dish. A metal baking dish or an oven-safe bread-baking vessel is suitable, provided it can safely withstand the baking temperature.
The parchment paper helps prevent sticking and makes it easier to remove the finished loaf.
Step 7: Let the Dough Rise Again
Cover the shaped dough loosely and allow it to rest for another 20–30 minutes.
During this second rise, the dough should become slightly puffier. Meanwhile, preheat your oven to 400°F (200°C), ensuring it reaches the correct temperature before baking.
Avoid letting the dough rise for too long. Overproofed dough may spread out or lose some of its structure in the oven.
Step 8: Bake the Bread
Place the baking dish in the preheated oven and bake for approximately 35–40 minutes.
The loaf should develop a rich golden-brown crust and feel firm on the outside. If the top becomes dark too quickly, loosely cover it with aluminum foil during the final part of baking.
For a more reliable doneness check, the center of the fully baked loaf should reach approximately 200–210°F (93–99°C), measured with an instant-read thermometer.
Baking times may vary depending on the size of the loaf, your oven, and the type of baking dish.
Step 9: Remove and Cool
Carefully remove the baking dish from the oven using oven mitts.
If it is safe to do so, lift the loaf out using the parchment paper and transfer it to a wire cooling rack.
Allow the bread to cool for at least 30 minutes before slicing. Cooling allows the interior crumb to finish setting and helps prevent the bread from becoming gummy.
Step 10: Slice and Serve
Once the bread has cooled, use a serrated bread knife to cut it into approximately 10 slices.
The finished loaf should have a golden crust and a soft, tender interior. Serve it wit
